Using VSCode at BNL
For general information about VSCode and its features, see the VSCode Overview.
This page covers BNL-specific setup instructions for using VSCode with the BNL Analysis Facility.
Remote-Tunnels Setup at BNL
Step 1: Create a Secure Tunnel on the Remote Machine
You can grab the CLI through a
standalone install. However, the
executable code has already been installed as
/cvmfs/atlas.sdcc.bnl.gov/users/yesw/t3s/bin/code.
Create a secure tunnel with the tunnel command:
It would print out something like:
* * Visual Studio Code Server * *
By using the software, you agree to
* the Visual Studio Code Server License Terms
  (https://aka.ms/vscode-server-license) and
* the Microsoft Privacy Statement
  (https://privacy.microsoft.com/en-US/privacystatement).
* To grant access to the server, please log into
  https://github.com/login/device and use code B45E-B1C0
On a browser, following the above instruction, visit
https://github.com/login/device, input the code. On the next web page, click on
the button of Authorize Visual-Studio-Code.
Afterward, the remote machine screen would prompt:
Provide a name to the remote machine, for example, BNL-ATTSUB.
Then it would yield something like:
[2023-09-25 22:22:51] info Creating tunnel with the name: bnl-attsub

Open this link in your browser
https://vscode.dev/tunnel/bnl-attsub/home/tmp/yesw
Now you can explore the files on the remote machine, and use VSCode to edit file:
- Either on a browser, open the above link: https://vscode.dev/tunnel/bnl-attsub/home/tmp/yesw
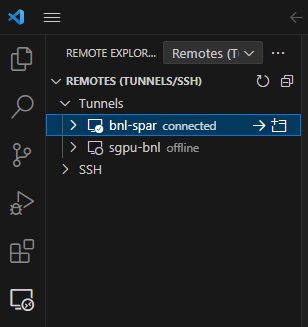
- Or in VSCode client, open Remote Explorer, click on Remotes, then Tunnels, choose the name BNL-ATTSUB.
In the VSCode client, you can see the name BNL-ATTSUB as shown in the following screenshot:
Upon opening a folder/file, you just click on the button of
Yes, I trusted the authors.
SSH Access
For SSH-based connections to BNL, see the SSH Access Guide for information on connecting through the BNL gateway.
Getting help
Need help?
See our Getting Help page for support options and how to reach the ATLAS AF team.